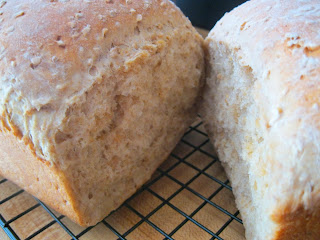
I found this recipe by accident, tinkered with it over the past week, and voila! We have our new favorite bread recipe, and it is oh so yummy! It can be modified very easily, which I can't help but doing - some days I substitute a half cup of flax seed, sometimes wheat bran or wheat germ, sometimes I combine flax, wheat bran, wheat germ and oat bran to make one cup, in place of one cup of the whole wheat flour...just have fun with it!
Irish Oatmeal Bread
- 2 1/4 cups boiling water
- 1 3/4 cups steel cut oats
- 1 Tbl. salt
- 3 Tbls. butter
- 3 Tbls. brown sugar
- 4 1/2 tsps. yeast
- Dash of sugar
- 1/2 cup warm water
- 3 1/4 cup all purpose flour
- 3 cups whole wheat flour
- Crisco or cooking spray
Combine first five ingredients in a large bowl, or in the bowl of a stand mixer if you have one. If you have one, *sigh*...I use a mixing bowl and a wooden spoon. Let the oatmeal mixture sit for 25 minutes, or until thickened and the oats are cooked a bit. Dissolve the sugar and yeast in the water, let is sit about five minutes or until it's foamy - grease or spray your other large mixing bowl while it's sitting. Once the oat mixture has cooled, (the twenty five minute thing) stir the yeast in. With your big wooden spoon - or your mixer - add the majority of the flour and mix very well. You might want to save out about a cup of the all purpose flour and use that to flour your counter and knead the rest into the bread dough. Knead for about eight minutes or so, or until it's a nice smooth ball. You'll want to grease your hands so the dough doesn't stick to you, though the dough itself will feel sticky no matter what. So once you're done kneading, toss it into the other great big greased bowl...turn it once so that all of the dough has some non-sticky-stuff on it, and cover with a tea towel, set to rise in nice warm place. (I had a cake in the oven while the bread was making, so the top of the stove was nice and warm...just an idea.) Let it rise for about an hour.
Your dough should look something like this after an hour...now you get to punch it down, like so -

After you punch it down, cover it up for five more minutes. While it's resting, grease your pans, or spray them. Divide the big dough ball in half, and divide each half in half. You'll have four halves. In't math fun? Work each little dough lump into a little dough ball, and get it as smooth as you can. You may end up with a little seam in one side of it - just put that side down in the pan. Should look something like this:
 Cover the pans up, and let them rise for another half hour or so, until they double in size. At this point, it'll look almost like a real loaf of bread! Only, raw. So pop them in the oven at 350 for approximately 45 minutes.
Interestingly, my batch only took about 30 minutes to bake today, so I'd recommend checking them after about thirty minutes. How do you know they're done? Well, if they're nice and brown on top and sound hollow when you knock on them, then take them out of the oven. With a potholder on both hands, tip the bread out into one of your hands and look at the bottom - brown? Chances are it's done. To be absolutely sure, pop the loaf onto your cooling wrack and gently break it open in the middle. If it's doughy, stick it back in the pan for the rest of the time on the clock. Cooking isn't all science, a lot of it is guesswork.
Cool them on your rack for at least 10 minutes before you slice, otherwise they'll squish when you try to cut through them - but as soon as possible, grab the butter and the jam, make a cuppa Earl Grey, and enjoy your fresh yumminess!


very nice Lindsay! Love how you write, love the pics, and I can almost smell the lovely fresh bread! I must make bread tomorrow!
ReplyDeleteHappy to know you are enjoying the ramblings of your daughter :) I'm not very handy at taking pictures, that's an area I need to work a little more at...it's kind of tricky taking pictures at every step of the way, and trying to get lighting right, etc...ugh. But yeah, the bread tastes wicked good, especially a bit warmed up with some Earth Balance and jam on it!!
DeleteOh that looks yummy! I especially like the hand print in the middle of the dough after you "punched it"!
ReplyDeleteI liked that too! I punch it then flip it over and press my hand into what was the underside, then cover it back up.
Delete