Tuesday, January 29, 2013

Probiotic & Enzyme Salad

     All thanks to Kimberly Snyder for this recipe, and for the knowledge and information pertaining to intestinal and whole body health that she has made available through her blog, and book. I'm enjoying the read, and this is part of my journey - most certainly an interesting phase of the journey, but I'm definitely curious and anxious to see where it leads! So far so good, but I'll keep you posted.


Ingredients:
  • 1 head green cabbage
  • 4 inches fresh ginger root, peeled and grated
  • 1 tablespoon white miso paste
  • 4 cups water
  • Mason Jars
Shred cabbage using food processor, mandolin, stand grater, or knife. Just make it thin.

Save 6 outer cabbage leaves to use later.

Peel and grate the ginger, toss in blender with miso paste and water. Blend til smooth.
In a large mixing bowl, pour brine liquid over shredded cabbage and mix very well.
Scoop into sterilized mason jars, packing very well, but leaving room for salad to expand - fill to within two inches off the top. Roll up two cabbage leaves and stuff them into the space at the top.


Screw the lids on very tightly, and put the jars of salad in your pantry for the next five days.  On day five, open the jar, remove the rolled up leaves, and store in the refrigerator. The salad is good for a month in the fridge after you open it - bubbling is a good sign, it means there's some good and healthy probiotics going on! Enjoy at least a half cup before dinner, but try to eat some with your lunch as well.


I'm not sure how this is going to turn out, but I will certainly keep you posted as to whether or not I'm enjoying this particular yumminess! Looking forward to the health benefits, though!

Chocolate Chip Oatmeal Cookies - Take One

  Today I met my Interminably Long Baking Project - aka, making the chocolate chip cookies that you only dream about eating in your sleep and then when you wake up you have absolutely no idea what the recipe is or the process of perfection - but the taste lingers on, well past your morning banana. 


 Oh. You don't have dreams like that? Ah. I see.


This is almost awkward.

Ok, so here's the thing. This whole not having eggs thing normally doesn't bother me in the least - they're nutritionally not important, I can't stand the smell of them, and they add fat and calories where I'd rather have either A) none or 2) chocolate. 

But making cookies without eggs, frankly, can be tedious. Unless you use pumpkin. Pumpkin makes good cookies...I think we'll be having pumpkin cookies next week....Anywho...

Can I make cookies without eggs? You bet your sweet bippy I can. They're pretty darn decent, too! No eggs, no oil, no refined sugar and yes they even taste good! I can whip up a nod-worthy no bake cookie peanut butter cookie ball, too. 

Go ahead and lick the beaters! No eggs, remember?  
But it's the texture!!!! Oh, how I miss a nice, fluffy, cakey, soft, chocolate chip cookie! Not those thin things that spread all over the cookie sheet, either. A good solid cookie, with like three eggs in the batch. This texture can be achieved with the addition of a fruit puree of some sort; it works marvelously - but sometimes ya just don't wanna taste banana in your cookie, and every now and then pumpkin wears on ones food-nerves. Know what I mean?
So today we made cookies. We who? We me and the cat! Katie's a pretty good girl, just sits and watches, doesn't talk back, meows some encouragement occasionally, and donates the odd cat hair or two to the recipe. I'm joking!! (I think...)

Miss Katie enjoys a little cookie dough, herself.

Now, these came out pretty darn well! I was pleased with them, that cute pastor of mine (refresh your memory in the About Me section if you need to) says they're good, and the kids won't keep their mitts out of the zippy bag - but they're just not perfect yet.

They're not the cookies of my dreams...
I like my tea in a beaker
But heck, they're the cookies in my kitchen and I feel a cuppa Earl Grey comin' on - nook them for a few seconds right before you eat them, it seriously adds to the yumminess. Enjoy!

Makes 2 or 3 dozen, depending on how big you make them. We like a variety of sizes here, from pop-able to large-ish snack sized.

 ·         2 1/4 cups all-purpose flour
·         1/2 teaspoon baking soda
·         14 tablespoons (1 3/4 sticks) butter (we use Earth Balance) – room temperature
·         3/4 cup granulated sugar
·         1/4 cup packed light-brown sugar OR
·         1/3 cup pure maple syrup
·         1 teaspoon salt
·         2 teaspoons pure vanilla extract
·         1 tablespoon lemon juice
·         3 teaspoons egg replacer + 4 tablespoons water, mixed up last minute
·         2 cups (about 12 ounces) chocolate chips – we use non-dairy brands
Preheat oven to 350 degrees. In a small bowl, whisk together the flour and baking soda; set aside. In a large mixing bowl, combine the butter with both sugars; beat on medium speed until light and fluffy. Reduce speed to low; add the salt, vanilla, and egg replacement. Beat until well mixed, about 1 minute. Add flour mixture; mix until just combined. Stir in the chocolate chips. Drop by whatever sized spoonfuls you’d like onto an ungreased baking sheet –about 2 inches apart.  Bake until cookies are golden around the edges and set in the center, 10 to 12 minutes. Remove from oven, and let cool on baking sheet 1 to 2 minutes. Transfer to a wire rack, and let cool completely. 

Monday, January 28, 2013

Lego Birthday Cake

   
 Confession time. I don't stare dreamily at my flour bucket and baking soda container, mesmerized by the thought of measuring and sifting. Neither do egg whites dance through my head, wanting to be beaten stiff.  It's a rare occasion when I actually have enough powdered sugar to make enough frosting for a small batch of scones, let alone a birthday cake...
     I'm quite allergic to eggs, actually. It's part of the "almost vegan" thing. The thought of them makes me ill.


     I don't wear my apron very often, either. It's white, with chocolate stains on it from the times I actually have used it...it's just not very cute. Now maybe if it were blue and orange polka dot, or pink and brown, or lime green, maybe then I'd wear it! But I'll tell you what I do with it later.


Today, my baby boy turned ten! This is a big occasion, only happens once! His very favorite thing in the whole world, besides me, would be Lego's. (His very favorite things, pardon the grammar)  We had a bet back when he was eight, that he'd be as tall as me by the time he turned ten...he lost. So I figured the least I could do was make the boy his very favorite thing, in cake form!


This isn't paint. It's frosting.
 Do you know how much food coloring it takes to turn white frosting into a decent shade of blue?? And, FYI, the whole "New and improved! Now True Red!" is really a joke? For the life of me I couldn't get it past a nice deep pink...so half a tube of yellow later, we got a nice orange.


This is another one of those Almost Vegan surprises - it's not just that this is an egg-free cake, with no dairy or oil...We're on the right path to vegan right there! But, alas, we went and spoiled it with the red food coloring. Ah, the things we do for love! Do you know what they make red food coloring out of? Go google it.  Needless to say, I personally did not partake of any of the orange bits...I picked the L off my piece.


Egg-Free Lego Birthday Cake
  • 2 boxes cake mix (I used Pillsbury yellow cake.)
  • 2 cans frosting (Again, Pillsbury. Classic vanilla.)
  • 2 cups water 
  • 2/3 cup applesauce
  • 3 Tbls. Ener-g Egg Replace, mixed into an additional 1 cup of water
  • Food coloring of choice
  • Two loaf pans, one mini muffin tin, several Lego figures, love, music, and patience 

     Mix both cake mixes, two cups of water, and applesauce together. Measure additional cup of water, and add egg replacer, mixing quickly with whisk or fork to get it smooth. Pour into cake batter, mix well as you would with beaten eggs.  Make sure your pans are already prepared and your oven is heated. Measure out (I use a soup spoon) batter into muffin tin to make six mini muffins, and divide the rest of the batter between the two loaf pans. They should be half full. At this time, I personally sprinkled a handful of butterscotch chips into the batter in the pans - my son loves butterscotch, and I thought that finding a mysterious crunch as he was eating his cake would be vaguely reminiscent of the mysterious crunch that my feet feel when I walk in his room to tuck him in at night and step on his Lego's...but I digress. As quickly as you can after mixing the "eggs" into the batter, put the cakes into the preheated oven. The mini muffins should be done between 7-10 minutes, but the cakes will take an additional 20 minutes or so - check them when they are golden on the top by inserting a sharp knife or a toothpick. When they're done, set them on the cooling rack, wait ten minutes, and run a butter knife around the edges to make sure they're loose before you turn them over. Pray that the bottom was well greased, or you used parchment...nothing's worse than leaving half the cake stuck in the bottom of the pan!
     While your cakes are cooling, mix up your frosting. As in, scrape it out of the plastic container and into a mixing bowl (one at a time, not both at once, unless you want to do all one color) and add food coloring of your choice. Just a heads up, though - it takes a lot of food coloring to get a darker color. I think next time I'm going with lime green! As soon as your cakes are cooled, frost away!  Just remember that the mini muffins are the little thingy-madoodles on top of the Lego bricks that connect them to the other ones. Frost them one at a time after you get the base done. Decorate however you like, use whatever tools you have at your disposal - this isn't cake decoration 101 or anything. Personally, it took me about two hours to get these done after they came out of the oven, including mixing the frosting. When you're all done, wrap them up somehow (stick toothpicks in the sides to hold your wrapping up and away from the frosting) and put them in the fridge...I was out of plastic wrap and tin foil this afternoon, so guess what I wrapped mine up in? 

My apron.


Don't eat the red food coloring, but enjoy the yummies!


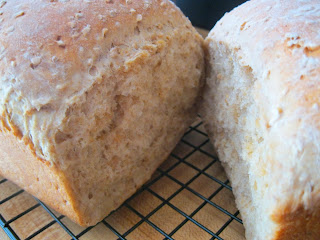
Most Excellent Oatmeal Bread


I found this recipe by accident, tinkered with it over the past week, and voila! We have our new favorite bread recipe, and it is oh so yummy! It can be modified very easily, which I can't help but doing - some days I substitute a half cup of flax seed, sometimes wheat bran or wheat germ, sometimes I combine flax, wheat bran, wheat germ and oat bran to make one cup, in place of one cup of the whole wheat flour...just have fun with it!
Irish Oatmeal Bread

  • 2 1/4 cups boiling water
  • 1 3/4 cups steel cut oats
  • 1 Tbl. salt
  • 3 Tbls. butter
  • 3 Tbls. brown sugar
  • 4 1/2 tsps. yeast
  • Dash of sugar
  • 1/2 cup warm water
  • 3 1/4 cup all purpose flour
  • 3 cups whole wheat flour
  • Crisco or cooking spray
Combine first five ingredients in a large bowl, or in the bowl of a stand mixer if you have one. If you have one, *sigh*...I use a mixing bowl and a wooden spoon. Let the oatmeal mixture sit for 25 minutes, or until thickened and the oats are cooked a bit. Dissolve the sugar and yeast in the water, let is sit about five minutes or until it's foamy - grease or spray your other large mixing bowl while it's sitting. Once the oat mixture has cooled, (the twenty five minute thing) stir the yeast in. With your big wooden spoon - or your mixer - add the majority of the flour and mix very well. You might want to save out about a cup of the all purpose flour and use that to flour your counter and knead the rest into the bread dough. Knead for about eight minutes or so, or until it's a nice smooth ball. You'll want to grease your hands so the dough doesn't stick to you, though the dough itself will feel sticky no matter what. So once you're done kneading, toss it into the other great big greased bowl...turn it once so that all of the dough has some non-sticky-stuff on it, and cover with a tea towel, set to rise in nice warm place. (I had a cake in the oven while the bread was making, so the top of the stove was nice and warm...just an idea.) Let it rise for about an hour.  


Your dough should look something like this after an hour...now you get to punch it down, like so - 


After you punch it down, cover it up for five more minutes. While it's resting, grease your pans, or spray them. Divide the big dough ball in half, and divide each half in half. You'll have four halves. In't math fun? Work each little dough lump into a little dough ball, and get it as smooth as you can. You may end up with a little seam in one side of it - just put that side down in the pan. Should look something like this:

Cover the pans up, and let them rise for another half hour or so, until they double in size.  At this point, it'll look almost like a real loaf of bread! Only, raw. So pop them in the oven at 350 for approximately 45 minutes.


Interestingly, my batch only took about 30 minutes to bake today, so I'd recommend checking them after about thirty minutes. How do you know they're done? Well, if they're nice and brown on top and sound hollow when you knock on them, then take them out of the oven. With a potholder on both hands, tip the bread out into one of your hands and look at the bottom - brown? Chances are it's done. To be absolutely sure, pop the loaf onto your cooling wrack and gently break it open in the middle. If it's doughy, stick it back in the pan for the rest of the time on the clock. Cooking isn't all science, a lot of it is guesswork.


Cool them on your rack for at least 10 minutes before you slice, otherwise they'll squish when you try to cut through them - but as soon as possible, grab the butter and the jam, make a cuppa Earl Grey, and enjoy your fresh yumminess!


The "Almost" Part

     So I've gotten a few questions from a couple different blog readers, asking "What's so 'almost' about your style of cooking and eating?" and "When does the 'almost vegan' come in? It seems all vegan to me."
     First of all, being vegan has to do with more than just what you eat. It's what you believe, what you stand for, your morals, ethics, compassion, and entire lifestyle - being a true vegan means that not only are animals not on the menu (but on the guest list!) but that you don't use any part of the animal, in anything. Like lipstick, nail polish, food coloring, artificial flavor, shoe leather, wool rugs...get my drift? Being a vegan is an entire life style, not just a food style.
      My personal viewpoint? I don't want to eat animals. I don't like it, I think it's wrong, I feel bad for them, it makes me ill to think of the process, they deserve a whole lot better life than being bred for the dinner table in abominable living conditions, and I believe that animal protein is terribly unhealthy for human beings. Eat plants! However. I also don't believe in taking my convictions so far that it negatively affects my family life, finances, or causes excessive difficulties in the kitchen, which in turn complicate other aspects of life.
     Example: I'm allergic to beef and carrots, so what sort of broth do I use for soup? (Don't use broth, you say, use water. Pardon, but I prefer soup with flavor, not an overabundance of seasonings...neither do I like watery soup.) I use the one brand of chicken broth in the entire grocery store that has neither artificial flavor, coloring, preservatives, or extra ingredients that you couldn't buy off the shelves - and doesn't contain carrots. Seriously, check the labels next time. Carrots are in every-freakin-thing...  
     Another example: My family is a huge fan of lasagna. (You too, huh? I've got a great recipe, if you'll give me a post or two) I've experimented with the true vegan lasagna recipes, and eh, they're ok. But the price tag! Wow! Checked the price on soy cheese lately? And you can't even find vegan mozzerella around here, you have to order it online or through co-op...so now we have a very rare and expensive Italian treat, that doesn't taste half as good as it should. What do we do? We make our own ricotta (stay tuned), and use a small quantity of real cheese - but not mozzerella. Why? Because I'm lactose intolerant, and it ain't pretty when me an' mozz mix. But did you know that the longer a cheese ages, the less lactose it has in it? So those really hard, sharp cheeses? Lactose free! So no, I don't like thinking about the animals that gave me the cheese, and I don't like to use it often due to health concerns...but in this household, we use real cheese sparingly instead of the fake cheeses. We save money, and we don't eat chemically processed products. (When you check the price, check the ingredient label in some of those faux cheeses.)
     In addition to the chicken broth and asiago cheese, I have one more mind blowing explanatory bit about the Almost part - on occasion, I ingest chicken and tilapia. Shock and awe!!! Why, you ask? Have you met my grandmother? She's great and I love her, but holy asparagus...when it comes to making dinner for a "vegan" she get heart palpitations and worries me! And I can't remember the last time she came to dinner over here, come to think of it...and when she asks me what we're having for dinner, she asks with this strange laugh, then says she assumed we were having beans and rice again, and wonders how we get enough nutrients and why we haven't gotten deathly ill yet, not getting enough calcium and protein and all that. So, it's become easier to let her know that I'll eat chicken, as long as it doesn't taste like chicken...and it's half burnt...and very small...with a lot of broccoli on the side. Why do I eat fish? Because I have a husband and young children, and they're so very patient with me...they love Tilapia, so once or twice a month I make herbed and olive oiled Tilapia with rice pilaf from a box! and a big pile of something green.
     There are probably more reasons as to why "almost", but this seems long enough for now. And has probably generated a few more questions, while answering the two. Hope this sheds some light, and I do hope you'll be back for the recipes I have planned for this afternoon/evening's posting! It's been a fun day of baking, and I just hope you get to do the same! When you do, enjoy the yumminess!!

Saturday, January 12, 2013

Doctored Up Pancakes

After Josh decided that it would be more fun to be a part of the clamor of Saturday morning, rather than attempting to doze through it, we decided it was time to make pancakes. I flipped through a few cookbooks,  attempted to converse with a five year old while debating between whole wheat, oat bran, cornmeal, or oatmeal pancakes and did I want to use blueberries or bananas in them...then shut the cookbooks with a bang and grabbed the pancake mix off the shelf.
Doctored Up Pancakes 
  • 2 cups pancake mix ( I used Bisquick)
  • 1/4 cup oat bran
  • 1/4 cup cornmeal
  • 2 tsp. baking soda
  • 1 1/2 cups soy milk
  • 1 tbl. lemon juice
  • 1 tbl. vanilla
  • 1/2 cup applesauce
Mix the lemon juice and vanilla in with the milk, set aside. If you're using an electric griddle ( I do) plug it in now, spray with cooking spray, and mix up your dry ingredients. Just remember that applesauce is, in fact, not dry. Pour the milk mixture into the dry, and add the applesauce in now. Mix it all together and let it sit while you go set the table or look at the new Lego motorcycle your son built. Test the griddle by dropping some water on it - if it dances, it's hot enough. If it sizzles up really quickly and looks mad, turn the griddle down. When it's just right, scoop the batter out using a measuring cup, and wait for them to look dry around the edges, with bubbles on the top - don't keep sticking your spatula under there to see how dark they are. 


Flip them over, starting with the first one you dolloped onto the griddle, and don't be scared of them - if you hesitate too much in flipping them, they might go all over the place and make a mess. Just flip 'em. Give them another minute or two to cook, while you put the maple syrup and jam on the table and pour the milk. You can stick your spatula under them to check for darkness, and when they're just right, plate them onto an oven safe platter/plate/pie plate and stick them in the oven on "Warm" until the next round is done. It should only take you about 10 minutes for two batches, and there will be enough to serve 2 adults and 2 kids...unless you're really really hungry, in which case I advise you to make that smoothie first. 

We use real maple syrup, not the fake stuff, on ours. It's more expensive, but it's better for you since it's just maple syrup and doesn't have all kinds of added grossness to it that is completely terrible for your health. So enjoy the yumminess! 


Orange Mango Berry Smoothie

Saturday morning! A morning for sleeping in, no demands, and general peace and harmony, right? Yeah. So Jacob was up at 6:00 playing Nerf guns with the cat, and when Emmaleine got up half an hour later, they decided it was a great time to come play in the living room. Our bedroom door (lovely french doors, keep absolutely no sound out) is right off the living room. Don't get me wrong, they're great kids! They just have one volume. Jacob remembered the rules ("Don't knock on our door unless the house is burning down or there's blood.") and stood outside our door asking, quietly, if he could use the computer. Then he asked louder. And put his mouth right up to the crack in the door...and asked again, louder. So he played Hero Factory online for awhile, with all the sound effects on high, and Emmie was a cheerleader for his achievements. I decided the bed wasn't that comfortable after all.
The clamor for food was immediate, but it was a toss up between smoothies, blueberry cobbler, leftover pizza, or pancakes. After a few moments of reasoning, we decided on smoothies and pancakes! This is a basic recipe for what we had this morning, but feel free to mix and match your fruits - just be wary of melons as they don't blend very well with other fruits. I'll be posting many other smoothie recipes, but this was a hit this morning.


Orange Mango Berry SmoothiesMakes 36 ounces
  • 2 naval oranges
  • 1 fresh banana
  • 1 frozen banana
  • 1 1/2 cups frozen mango berry fruit blend
  • 1 cup soy milk
  • 1/2 cup soy yogurt or greek yogurt
 "Frozen bananas???" Yes. When you buy a bunch of bananas, buy a lot. Peel three or four, slice them, and put them in individual freezer baggies, and freeze them. Take them out as needed. They add nutritional value to your smoothies, a great creamy texture, and negate the need for icecubes. You can also replace dairy/soy ingredients with frozen bananas in some recipes, which we'll talk about later.
You can either peel your oranges whole, or slice them - pick your battle, basically. I think peeling them first, as opposed to peeling them sliced, works much better, with less juice squirting in your eyes.

Put the oranges in the blender (I'm using a Vita-Mix) and pulse three or four times until they're getting chopped up. Puree for about 30 seconds, or until you have some lovely orange juice going on in the bottom.
Add the yogurt, soy milk, and a dash of vanilla, fresh banana, frozen banana, and frozen fruit in that order.

Pulse three or four times, make sure nothing gets stuck under the blades. If it does, use a rubber spatula to un-wedge it. Blend for about 30 seconds, check it, and blend again for another 30 seconds or until smooth and creamy. It will be a nice thick consistency. Pour into as many glasses as you'd like, and enjoy the yumminess!


Thursday, January 10, 2013

Black Bean Taco Salad

This is one of those "What do I have in the fridge?" recipes for when your husband doesn't come home for lunch, you really don't want the leftover Lentil Chili because you've started an intensive 6 week weight loss kick start (we'll talk about vegan dairy products later!) and you want to save your cooked foods and grain for dinner time...But that's my life, not yours. Here's the recipe for today's lunch:


Serves 1
  • 2 cups romaine lettuce, chopped
  • 5 cherry tomatoes, halved
  • 1 Persian cucumber (or half of a regular cuke)
  • 1/2 cup organic black beans, drained and rinsed
  • 2 tsps taco seasoning
  • 1/4 cup salsa
  • 2 Tbls water
  • 9 Santitas tortilla chips
            *Corn and shredded vegan cheese are optional
 Toss romaine, tomatoes and cucumber in bowl. Roughly crumble chips on top, toss together.  In a small microwave safe bowl, mix beans, water, and taco seasoning. Microwave one and a half minutes, then mix in salsa. Pour mixture on top of salad in bowl, enjoy with a fork!


Eat To Live

A little more than five years ago, soon after my third little blessing was born, I realized that my tummy had some issues. Looking back now, I realize that these problems have been life long, I just hadn't paid that much attention to them or chalked them up to other causes. But when I finally realized how crappy I felt, how bad my tummy hurt all the time, how much time I was spending in the bathroom after meals and between meals, I realized I needed to do something. At that time I was working with my Mum in her lovely Tea Shop, where we made and served the most wonderful baked items, lunches, desserts, teas...oh it was just my favorite place EVER! So were the ladies we met along that journey - what a joy they were! We made everything from scratch, mostly from organic ingredients, and it was probably the healthiest place in town...unless you have food allergies.
I spent the next few years trying to isolate what disagreed with me, using my own elimination testing. I now recommend that you go to the doctor for that! Wow, was I ever wrong. First I thought, well, I just don't handle carbohydrates very well. So I cut waaaay back on breads, crackers, potatoes, pasta, and ate mostly protein - meat, eggs, yogurt - with a smattering of fruits and vegetables. That didn't work, and instead I felt worse after a few months! I lost quite a bit of weight, but that probably had something to do with copious amounts of coffee, very little food, and a huge stress load...
So then I though to myself, "Self, perhaps we have a gluten intolerance!" It certainly fit a lot of the symptoms I was having, seemed like a good bet, so off we went down that rabbit trail. Several months of gluten free, high meat and cheese intake, moderate vegetable consumption...and I gained over 20 pounds and was still sick. My husband and I got married around this time, and with his wisdom, decided it was time to go for real allergy testing! 
This was also about the same time that my parents went fairly vegetarian (still eating fish) and I thought they were nuts! How do you survive without meat?? Remember, I only like meat if it doesn't taste anything like meat, so who's the crazy one? My mum shared some nice recipes with me, my belly felt good, I didn't spend the evening in the bathroom, didn't get a migraine or light headed or an asthma attack...it was nice! So I ventured into the only eating fish arena, but kept the eggs and dairy while I was allergy testing. And then the results came in.
I am allergic to Barley,Beef, Carrots, Coffee, Coconut, Cinnamon, Egg Whites, Egg Yolks, and am lactose intolerant. Yeah, read that list again. Now go check the bread you have in your pantry, your bagels, salad dressings, and all your prepackaged foods. Uh-huh. Malt is Barley. Albumen is Egg. Vegetable broth? Yup, carrots. 
That's enough to make you change what's in your fridge and pantry, now isn't it? Add to that the extensive reading on nutritional studies I had been doing and the way my tummy felt when I didn't put toxic ingredients into it, and it made a convincing argument for "going vegan"! 
In November of 2012, I made the decision to adopt a Plant Based lifestyle.  There are many more reasons for this beyond the allergies and digestive issues, and hopefully in the coming months I'll be able to intelligently share those with you and allow you the opportunity to improve your health, and the ongoing health of your family and children, for generations to come. It is my desire to be the best mommy and wife, the healthiest me that I can be, and a good steward of all the goodness we have been blessed with.  I want to live until I'm ancient, with lots of great-great grand babies to fully enjoy - it is my desire to eat to live, and I hope one day you will share that drive with me. 
Blessings, and munch well!

Beginnings

Getting a blog off the ground is rather intensive work! And that's just the setting up bit, not even the earning readers part...but here we are, none the worse for wear, and having learned just a smidge about templates and designs and too-complicatedness. Yes, that is now a word.
This, being the first post, will not be overly informative. I'll not be explaining "Why Vegan?" or "What's up with the Almost Vegan thing?"  or sharing information as to nutritional values and ingredients and chemical/biological breakdowns or how things interact with your system or your overall well-being, health, family values, industrialized farming and soil content, or compassion for animals. There will be no quips or sage words of food wisdom, no tips on eating with allergies or how to replace ingredients, no recipes or meal plans or photos. Why? 


Well, you see, I've got this bowl of black bean taco salad waiting for me on the coffee table.